That's right, I passed!
Ok, I admit, I spent a little too much time making Christmas ornaments, sewing handmade gifts, and shopping for/wrapping presents, and not enough time studying.
If not for the munchkin, I may not have studied at all! Ryan has had to go in at night to work, so it was just me and Ella for a handful of nights. She's in the phase where she is very attached and very needy. She wants someone to sit with her until she falls asleep. There's not much I could do besides read (there was Family Feud for the iPad, but I limited myself to Fast Money rounds and up to 3 full games a night). Plus, all the overtime helped solidify my understanding of labor laws and the Fair Labor Standards Act. Woohoo! Yes, I realize how dorky that sounded.
Anyway, I'm in overdrive as I'm trying to "wrap up" everything before Christmas -- in less than 2 weeks! Hopefully, I'll find some downtime to snap a few shots and get some posts scheduled :)
Tuesday, December 13, 2011
Friday, December 2, 2011
Decorating the tree
Last year, Ella was only half a year old for her First Christmas. It was fun, but now that she's a little older and a little more vocal, we can't wait to celebrate with her. She loves the holiday decorations at the mall. Everytime she sees Santa or any likeness she shouts, "Sanna! Sanna!" The loaded toy aisles every where we go, and the stash of presents we've already picked out make her so excited. I wanted to do something fun for our tree. So I started making felt ornaments that she and the other cousins can enjoy.

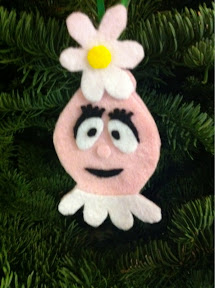

They were super easy to make. I printed out the pages from www.nickjr.com and used my lightbox to trace out the facial features and create a template. I cut out the felt using the template and used tacky glue to piece it all together. There's a layer of report cover plastic in each head with a hole punch, where I tied the ribbon. That way it prevents the ribbon from detaching and adds reinforcement to the whole ornament.
It's also easier to use a pair of embroidery scissors to cut out the pieces. Initially I used a pair of 7" 3M shears. That wasn't a safe idea. For my fingers or my face. Haha, it's detail work, you definitely want a pair of detail cutters.
I have a feeling they'll be very short lived. They're too much of a distraction and she just stands, points, and screams. Hopefully she'll get used to them and we can leave them up.
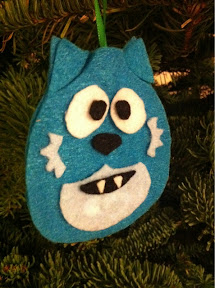
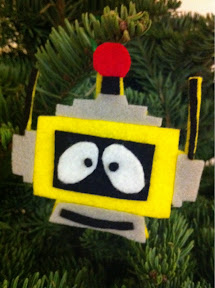
Yoooooooooo Gabba Gabba!!
MUNO! He's tall and friendly:
FOOFA! She's pink and happy:
BROBEE! The little green one:
TOODEE! She likes to have fun:
PLEX! A magic robot:
They were super easy to make. I printed out the pages from www.nickjr.com and used my lightbox to trace out the facial features and create a template. I cut out the felt using the template and used tacky glue to piece it all together. There's a layer of report cover plastic in each head with a hole punch, where I tied the ribbon. That way it prevents the ribbon from detaching and adds reinforcement to the whole ornament.
It's also easier to use a pair of embroidery scissors to cut out the pieces. Initially I used a pair of 7" 3M shears. That wasn't a safe idea. For my fingers or my face. Haha, it's detail work, you definitely want a pair of detail cutters.
I have a feeling they'll be very short lived. They're too much of a distraction and she just stands, points, and screams. Hopefully she'll get used to them and we can leave them up.
Wednesday, November 30, 2011
YuZu have to try this place
YuZu Restaurant
410 Atkinson Dr
Honolulu, HI 96814 (808) 943-1155
Located on the ground floor of the Ala Moana Hotel, YuZu, the most recent work of Chef Isamu (Hale Macrobiotic), offers a cute lunch spot with mouthwatering options.
This yuzu honey drink is made from deep sea water. It was really good. Almost like a non-alcoholic mojito, but at the alcoholic price. The cute straw wrapper accent was cute. Almost makes you want to do it everytime.

Lightly salted edamame and a watercress-lettuce salad. The watercress is local from Watanabe Farms and had a very mild flavor, the yuzu dressing was also good.

The lunch menu comes as a set, you choose the main entree that varies day by day. I selected the daily special: Spicy Tan Tan Udon. The udon noodles came in a large pot of water with a smaller bowl of the dipping broth. The dipping broth was a spicy sesame medley of tender slices of chicken and mushrooms. I enjoyed it and would defintely order it again.

As an additional add-on, you can choose a set. I wanted to try the yakitori and temari sushi combo. The yakitori had two skewers: one teriyaki and one shio yuzu. Delicious! So tender, so flavorful. YUM. The temari, wowzah! The shoyu yuzu was already in the rice, so no additional flavor was needed, and the fish was delicious. One tuna and one salmon with ikura. I honestly don't like salmon or ikura. But with whatever that white stuff was, made it awesome. The wasabi and pickled ginger helped a little, too.

I would definitely go again. In fact, I went on a Wednesday, then on that Saturday while dining in the area , I suddenly realized we should have gone their instead. Then I vowed to suggest it next time we're shopping and looking for somewhere to grind.
Next time, I hope to try the Beef Sukiyaki Udon and the various Vegetable Sushi. What? Carrot puree like uni? Tomato like maguro? Mushrooms like unagi? That's crazy talk. Crazy delicious talk!
410 Atkinson Dr
Honolulu, HI 96814 (808) 943-1155
Located on the ground floor of the Ala Moana Hotel, YuZu, the most recent work of Chef Isamu (Hale Macrobiotic), offers a cute lunch spot with mouthwatering options.
This yuzu honey drink is made from deep sea water. It was really good. Almost like a non-alcoholic mojito, but at the alcoholic price. The cute straw wrapper accent was cute. Almost makes you want to do it everytime.
Lightly salted edamame and a watercress-lettuce salad. The watercress is local from Watanabe Farms and had a very mild flavor, the yuzu dressing was also good.
The lunch menu comes as a set, you choose the main entree that varies day by day. I selected the daily special: Spicy Tan Tan Udon. The udon noodles came in a large pot of water with a smaller bowl of the dipping broth. The dipping broth was a spicy sesame medley of tender slices of chicken and mushrooms. I enjoyed it and would defintely order it again.
As an additional add-on, you can choose a set. I wanted to try the yakitori and temari sushi combo. The yakitori had two skewers: one teriyaki and one shio yuzu. Delicious! So tender, so flavorful. YUM. The temari, wowzah! The shoyu yuzu was already in the rice, so no additional flavor was needed, and the fish was delicious. One tuna and one salmon with ikura. I honestly don't like salmon or ikura. But with whatever that white stuff was, made it awesome. The wasabi and pickled ginger helped a little, too.
I would definitely go again. In fact, I went on a Wednesday, then on that Saturday while dining in the area , I suddenly realized we should have gone their instead. Then I vowed to suggest it next time we're shopping and looking for somewhere to grind.
Next time, I hope to try the Beef Sukiyaki Udon and the various Vegetable Sushi. What? Carrot puree like uni? Tomato like maguro? Mushrooms like unagi? That's crazy talk. Crazy delicious talk!
Monday, November 28, 2011
Another bout of ambitiousness
Saimin is a noodle soup dish that is popular in Hawaii, and one of the top favorites for kids. It has noodles (kids love noodles) and mild broth pleasing to the palate, unlike ramen which focuses more on having good, chewy noodles and a rich, flavorful broth.
One of THE BEST places to get saimin is at Hamura's Saimin on Kauai.
Unfortunately, that is a plane ride away. However, you can buy the noodles and make your own saimin at home! Of course it won't be as delicious. I don't have time for a slow simmered, days long vat of soup. BUT I do have time to make some roast pork!.
Roast pork isn't too ambitious, right?
Thursday, November 3, 2011
What is in a name
A lot of older people have mentioned to me how much they love that we named Ella. I get the occasional, "Is it because of Twilight?" -- which, by the way, the character's name is Isabella or Bella. Not Ella. Although I may have been reading the books before I was pregnant, it wasn't our inspiration.
Ryan really wanted to name our first daughter Kaylee. I really liked the name, too. Until our friends named their daughter Kaylie. So that got crossed off our list. We also liked the name Addison, "Addy" for short. Until our PCP named her daughter Maddison (our other friends had a daughter a few months after us and named her Madisyn, so fortunately we weren't the name stealers that time..). I really wanted the name Calla. Like the lily. But some people thought that was lame. Shrug.
As we were driving from the ultrasound doctor's office, we were just talking and I said, "What about Ella?" The sound just resonated. We both loved it. There were no more discussions on what we would name our daughter. It's elegant, it's simple. It's the same name as Ella Fitzgerald. Although it's not the inspiration, many older people have stated that they love that we named Ella, and how much they love Ella Fitzgerald.
Monday, October 31, 2011
Missing loved ones
On a serious note...
It's been almost a year and a half since my dad passed away. How do I know? Ella is almost a year and a half. I love that Ella is growing up, but it kills me that each time she reaches a milestone and we celebrate, it's also a milestone of the time that has passed since the loss of my dad.

He just celebrated a birthday. Ella was two weeks old. He was painting our house. He loved diving. He was only 44.
There are so many times that I am reminded that he isn't around. When I want to call and ask a question, when I want to tell him something cute that Ella did that reminds me of myself, when I hear a funny joke only he would really appreciate, even when I eat something really good that I know he would find delicious, too.
This month has been especially harder for me. I went to a wedding. I almost made it through the whole event, until the father-daughter dance. It was a flashback like those you see on Cold Case. I didn't have a father-daughter dance (two, equally loved dads, too complicated), but I remember spinning around on the dance floor with Ryan and thinking of the biggest smile of pride that was glued to my dad's face the entire day. I broke down in tears and went running from the reception hall. We left immediately. I just couldn't pull it together.
Last week, Ryan's grandmother passed away. She was much older, she had a whole lifetime filled with experiences, children, grandchildren, and great grandchildren.
I don't know how people do it. Grieve. They say there are stages that one goes through, but it's more of a heptagon with lines connecting each point to every other point. Some times, I deny that he really is gone, the next I'll be angry at the circumstances which led to it, then I'll be accepting of it, then I'll be depressed, then I'll feel guilty that in those last few weeks he was painting my house. I'm just an all over mess.
Sunday, October 30, 2011
Another post about fabric
This is my 100th post! In the past 7 months, I've posted that many times? Not bad!
No, I'm not trying to spread out my posts. Well, not really. I drafted the previous post in the middle of September, and like I said, I had a bunch waiting to be published. I received these in a separate shipment and only got around to snapping a few pics the other night. I really should consider using an actual camera instead of my phone. I should probably use better lighting, too. I might even want to compose the shots better. To tell you the truth? Not going to happen.
Anyway, so on the shopping spree, I picked up a couple more things:
Anna Maria Horner - Innocent Crush, Mixed Signals in Fresh - Yardage
Robert Kaufman - Kona Cotton, Aqua 1005 - Yardage
Joel Dewberry - Heirloom, Sky - Fat Quarter Bundle

Sarah Jane - Children at Play, Balloons - Fat Quarter Bundle

Michael Miller - Camouflage, Gray - Yardage
Premier Prints - Wild Candy, Pink - Yardage

I grabbed the bundles because of the variety in prints. As I mentioned, for Christmas, there will be a bit of crafting. I needed this spree. If you saw my collection before, it was pitiful. Now I have something to work with!
I took a few minutes (don't worry, I didn't waste too much time) to match up coordinates for the gifts I'm making. I realized I wouldn't be using a lot of the Heirloom bundle. I don't want to insult anyone, but it's just a little tooold for me sophisticated. I even tried to imagine using it for Ella. That's way to grown up, I need to keep her in Children at Play as long as possible, maybe even throw her a Just Stay Little themed party.
I considered hosting a giveaway on my page. But I have like 2 followers (according to Blogger, if you have me in your Reader, speak up!). And one of them is ineligible (as if my husband wants to win my fabric?). So I decided to share my stash with my quilty crafty, co-workers, instead. If in the future I have more followers or maybe even some interest, I would do a giveaway. If it's only from a pool of 2 or 3 entries? That's some awesome odds of winning!
No, I'm not trying to spread out my posts. Well, not really. I drafted the previous post in the middle of September, and like I said, I had a bunch waiting to be published. I received these in a separate shipment and only got around to snapping a few pics the other night. I really should consider using an actual camera instead of my phone. I should probably use better lighting, too. I might even want to compose the shots better. To tell you the truth? Not going to happen.
Anyway, so on the shopping spree, I picked up a couple more things:
Robert Kaufman - Kona Cotton, Aqua 1005 - Yardage
Joel Dewberry - Heirloom, Sky - Fat Quarter Bundle
Premier Prints - Wild Candy, Pink - Yardage
I grabbed the bundles because of the variety in prints. As I mentioned, for Christmas, there will be a bit of crafting. I needed this spree. If you saw my collection before, it was pitiful. Now I have something to work with!
I took a few minutes (don't worry, I didn't waste too much time) to match up coordinates for the gifts I'm making. I realized I wouldn't be using a lot of the Heirloom bundle. I don't want to insult anyone, but it's just a little too
I considered hosting a giveaway on my page. But I have like 2 followers (according to Blogger, if you have me in your Reader, speak up!). And one of them is ineligible (as if my husband wants to win my fabric?). So I decided to share my stash with my quilty crafty, co-workers, instead. If in the future I have more followers or maybe even some interest, I would do a giveaway. If it's only from a pool of 2 or 3 entries? That's some awesome odds of winning!
Friday, October 28, 2011
I love fabric
Have I mentioned how hard it is to get anything in Hawaii? You might think I'm kidding, but unless you live here, you really don't know. By now, most people are educated in the fact that we are a part of the US (and a state) and don't surf to work at our normal non-hula related jobs. Many people have even visited Hawaii and realized, yes, we have traffic signals, ATMs and shopping malls. What are we? Natives?!
Anyway, we may be on par with the rest of the country -- with Whole Foods, Target, Victoria Secret, and Bath & Body Works, but we still don't have IKEA (no fabric and quick furniture) and we still don't have a really good craft store. We have Ben Franklin, which carries the bulk of all crafting necessities, but it comes at a steep price. We have fabric stores like Kaimuki Dry Goods and FabricMart, but they rarely get the new releases I see popping up in blogland and usually focus mainly on Hawaiian prints. Honestly, most of my craft supply is obtained from WalMart. I kid you not.
Thankfully, the invent and rise of the Internet has made shopping MUCH easier! Last month, Ryan let me go on a fabric spree (what can I say, lots of sales and free shipping is an easy sell).
Sarah Jane - Children at Play, Playtime - Fat Quarter Bundle

Michael Miller - Play Dot and Zoology in Sea - Yardage

David Textiles - Hello Kitty - Fat Quarter Bundle

Zoe Pearn Designs - Alphabet Soup Girl - Yardage

Anyway, we may be on par with the rest of the country -- with Whole Foods, Target, Victoria Secret, and Bath & Body Works, but we still don't have IKEA (no fabric and quick furniture) and we still don't have a really good craft store. We have Ben Franklin, which carries the bulk of all crafting necessities, but it comes at a steep price. We have fabric stores like Kaimuki Dry Goods and FabricMart, but they rarely get the new releases I see popping up in blogland and usually focus mainly on Hawaiian prints. Honestly, most of my craft supply is obtained from WalMart. I kid you not.
Thankfully, the invent and rise of the Internet has made shopping MUCH easier! Last month, Ryan let me go on a fabric spree (what can I say, lots of sales and free shipping is an easy sell).
Monday, October 17, 2011
Shower gifts - from before
I upgraded the IOS on my phone and realized (after 15 minutes of sync time) that I should take some photos off the camera. It turns out I had some pictures of a mother-baby set I made back in January! Before I deleted them, I uploaded them to share. I made a hospital gown, nursing cover, and a set of 6 burp cloths.
The story behind the gift: The shower was for a good friend, and I was a little late on starting the gift (try the night before the shower). Actually, we all were a little late.
My other friend and I were in charge of games and prizes (she came over the afternoon before the shower). BUT, let me tell you, we had this awesome idea to do a blind hunt for baby items. We took a large computer box, cut out a pair of arm holes (2 sets across from each other) and wrapped it with pretty paper. We then filled the box with an assortment of baby items (bulb syringe, baby bottle, sippy cup, medicine syringe, diaper, bibs, onesie, feeding spoons, pacifier, lotion, baby food jar, etc) and similarly shape/textured gag items (new XL disposable undies from the hospital, XL pad from the hospital, baby food jar filled with silly stuff, pens, water-soiled diaper, etc). We had the party split into two teams and had them race to find items using only their sense of touch to identify items. It was hilarious! We had the father of the mother-to-be pull out the XL undies thinking it was a onesie. We had another person pull out a baby jar filled with Tums instead of fruit puree. The best part, the baby items were all from the couple's registry anyway, so as a bonus they mostly got items they requested!
The prizes for the games were cute. We did a variety of snacks, reusable containers, and a few small crafty items. I really should have taken pictures of those. They were really cute. I guess I can recreate them for another event and post about it.
Anyway, here are my creations:


These are all super easy to make. I honestly started this the night before and managed to finish everything before the party (which was at noon). I really should make a bunch for reserve gifts. For close friends, of course I would pick out prints that match their baby theme, but now that I'm in that age group that is constantly having kids, it makes sense to have quick gifts at the ready.
The story behind the gift: The shower was for a good friend, and I was a little late on starting the gift (try the night before the shower). Actually, we all were a little late.
My other friend and I were in charge of games and prizes (she came over the afternoon before the shower). BUT, let me tell you, we had this awesome idea to do a blind hunt for baby items. We took a large computer box, cut out a pair of arm holes (2 sets across from each other) and wrapped it with pretty paper. We then filled the box with an assortment of baby items (bulb syringe, baby bottle, sippy cup, medicine syringe, diaper, bibs, onesie, feeding spoons, pacifier, lotion, baby food jar, etc) and similarly shape/textured gag items (new XL disposable undies from the hospital, XL pad from the hospital, baby food jar filled with silly stuff, pens, water-soiled diaper, etc). We had the party split into two teams and had them race to find items using only their sense of touch to identify items. It was hilarious! We had the father of the mother-to-be pull out the XL undies thinking it was a onesie. We had another person pull out a baby jar filled with Tums instead of fruit puree. The best part, the baby items were all from the couple's registry anyway, so as a bonus they mostly got items they requested!
The prizes for the games were cute. We did a variety of snacks, reusable containers, and a few small crafty items. I really should have taken pictures of those. They were really cute. I guess I can recreate them for another event and post about it.
Anyway, here are my creations:
Hospital gown front, with contrast bias binding on neckline
Hospital gown back, with tie at neck
Hospital gown shoulder, velcro enclosure
Hospital gown and nursing cover
Nursing cover, contrast neck straps
Nursing cover, inside terry pocket detail
Nursing cover and burp cloths
Burp cloths
These are all super easy to make. I honestly started this the night before and managed to finish everything before the party (which was at noon). I really should make a bunch for reserve gifts. For close friends, of course I would pick out prints that match their baby theme, but now that I'm in that age group that is constantly having kids, it makes sense to have quick gifts at the ready.
Friday, October 14, 2011
Busy bodies
I'm still around! I'm still crafting...sorta. Just not blogging. It's been a crazy few weeks.
I put crafting on hold so I could clean the house. Let's just say we had a bunch of guests come through and we didn't need them to know I was stash builder and dust hoarder. The sewing machine went into hiding and only recently peeked out from it's cover.
I made two dresses from a jersey knit sheet I snagged from Ross'. The dresses are navy blue and gorgeous when paired with my natural brown leather belt to cinch the waist. I didn't have a matching purse to complement the outfit, so I had to save my lunch money. Ahh the cost of coordination and looking fabulous! I guess I should've taken some pictures of the complete outfit (not that I need proof I did it, but I do have this blog after all). I really liked how they turned out, I actually wore one to a work function and received a lot of compliments!
I'm also studying for the PHR exam, which I will be taking in 2 months. It's been a few years since college and a few years since the last time I took an exam (that I needed to learn and study), so I've limited my crafting (and DVR watching) to study. I DO realize that I need to find time for both, as Christmas is 10 weeks away and a majority of the gifts include handmade items. I've created a schedule with chapters, review, and test prep, by week, so if I can finish the tasks for the week, the rest of the time I can spend crafting. Let's just say I have yet to finish my weekly plan early.
If you don't see anything from me from now until December 10th, I'm busy. If you do, scold me and tell me to get back to studying! Just kidding :) I actually have a few posts "in the edit" so I may update them and get them out of draft limbo. But I really must study. Really.
Here's a little peek of how it's coming with the holiday goodies:

No kidding, "peek"! Haha, it's not actually anything I've made. It's only the labels I've ordered to stick on the handmade items. Anyway, I got the idea from Crafterhours and knew I wanted to do something similar for my items (not that I sell them or anything, but it definitely adds a professional touch). I contacted the folks over at twilltape.com and within a few hours I had a working sample and was able to place my order. By the next day, I was invoiced, paid out the amount, and my order was in the mail. I love great customer service! They just came in, and they are lovely. The pictures do not do these justice. I think I may experiment with some grosgrain in the future.
I put crafting on hold so I could clean the house. Let's just say we had a bunch of guests come through and we didn't need them to know I was stash builder and dust hoarder. The sewing machine went into hiding and only recently peeked out from it's cover.
I made two dresses from a jersey knit sheet I snagged from Ross'. The dresses are navy blue and gorgeous when paired with my natural brown leather belt to cinch the waist. I didn't have a matching purse to complement the outfit, so I had to save my lunch money. Ahh the cost of coordination and looking fabulous! I guess I should've taken some pictures of the complete outfit (not that I need proof I did it, but I do have this blog after all). I really liked how they turned out, I actually wore one to a work function and received a lot of compliments!
I'm also studying for the PHR exam, which I will be taking in 2 months. It's been a few years since college and a few years since the last time I took an exam (that I needed to learn and study), so I've limited my crafting (and DVR watching) to study. I DO realize that I need to find time for both, as Christmas is 10 weeks away and a majority of the gifts include handmade items. I've created a schedule with chapters, review, and test prep, by week, so if I can finish the tasks for the week, the rest of the time I can spend crafting. Let's just say I have yet to finish my weekly plan early.
If you don't see anything from me from now until December 10th, I'm busy. If you do, scold me and tell me to get back to studying! Just kidding :) I actually have a few posts "in the edit" so I may update them and get them out of draft limbo. But I really must study. Really.
Here's a little peek of how it's coming with the holiday goodies:

Twill tape labels (picture from twilltape.com)
No kidding, "peek"! Haha, it's not actually anything I've made. It's only the labels I've ordered to stick on the handmade items. Anyway, I got the idea from Crafterhours and knew I wanted to do something similar for my items (not that I sell them or anything, but it definitely adds a professional touch). I contacted the folks over at twilltape.com and within a few hours I had a working sample and was able to place my order. By the next day, I was invoiced, paid out the amount, and my order was in the mail. I love great customer service! They just came in, and they are lovely. The pictures do not do these justice. I think I may experiment with some grosgrain in the future.
Sunday, September 4, 2011
Finished: Knit top for munch
So I ended up finishing Ella's top. I may add a few more embellishments by the time I wanted to have us sport these cutie-matching tops.
I was thinking off adding a faux button and strip to help stabilize the folds in the sleeves, or I could just add a button where I want to tack it down. We'll see. I might have to make some buttons!

If you noticed, there's a bit more added to the top than what was described in my cutting session. As I was piecing her top together, I realized it would be a little dinky and considering it has a super nice hem (thanks to the finished edge of the sheet) a frayed and weak neckline wouldn't look very nice. So I added a facing at the top. I can't remember where I read it, but it was of someone saying don't leave out the facing. It helps maintain structure over the life of the garment and gives clothing a polished look, even after numerous washings.

Don't make fun of my low quality pictures from my phone! You haven't complained yet. But then again, I always try to use natural light. Something about these CFL's make it so difficult to get decent shots at night. Blogging and crafting is hard enough! No way am I going to add photography to my list of goals.
I was thinking off adding a faux button and strip to help stabilize the folds in the sleeves, or I could just add a button where I want to tack it down. We'll see. I might have to make some buttons!
If you noticed, there's a bit more added to the top than what was described in my cutting session. As I was piecing her top together, I realized it would be a little dinky and considering it has a super nice hem (thanks to the finished edge of the sheet) a frayed and weak neckline wouldn't look very nice. So I added a facing at the top. I can't remember where I read it, but it was of someone saying don't leave out the facing. It helps maintain structure over the life of the garment and gives clothing a polished look, even after numerous washings.
Don't make fun of my low quality pictures from my phone! You haven't complained yet. But then again, I always try to use natural light. Something about these CFL's make it so difficult to get decent shots at night. Blogging and crafting is hard enough! No way am I going to add photography to my list of goals.
Saturday, September 3, 2011
Knits? Not?
I can't say this will be my first time working with knits. I refashioned a fan shirt for our football team by hand. I also had to fix the hem on a (fairly) new tank top that started to unravel. I also made a quick shoulder tote from a t-shirt. I found each experience to be tedious and frustrating.
So why am I posting? I want to make matching t-shirts for me and the munch!
So why am I posting? I want to make matching t-shirts for me and the munch!
Friday, September 2, 2011
Cooking: Kale salad with soy citrus dressing
After all those artery clogging recipes, I had to post a palette cleanser. Although, after eating this, you may feel just as guilty. It's kinda good.
It's one of the first times* Ryan and his parents ever tried kale. It was so new to them, they didn't know what to make of the texture and flavor, but they did admit it wasn't bad!
Ingredients:
kale
carrots
red cabbage
For Dressing:
4 oz shoyu
4 oz olive oil
2 cloves garlic
2 oz lemon juice (juice from one lemon)
1 oz water
Directions:
Soak kale well to clean all dirt off.
Chop kale finely, only down to tender ribs.
Julienne-cut carrots and shred red cabbage.
Mix all veggies in a bowl.
Use blender to combine dressing ingredients.
Pour dressing over salad and toss lightly until dressing covers the salad.
Other elements:
- Original post
- Slow-simmered carnitas
- Mac and cheese
- Carmelized onions, building the panini
- Kale salad with soy citrus dressing <--You are here
Thursday, September 1, 2011
Cooking: Carmelized onions for Panini
I'm sure you can find a load of how-to's on the internet for carmelizing onions, but I'll just give you my easy way.
Ingredients:
3 Tbsp butter
1 maui onion, sliced
Directions:
In a heavy bottomed skillet, saute onions and butter on Med-Lo heat. Stirring occasionally.
The trick is that you don't want to stir too little -- or it'll burn. But you don't want to stir too much -- or it'll never brown. If you don't have maui onions, you can add a little bit of sugar to help get the browning on. Salt and a little bit of water will help preventing the burning. However, if you want savory, well-developed, carmelized onions, you need to have patience. I'm sure you can get a batch out in less than 10 minutes, but they probably won't look like those brown rice noodle type onions that melt in your mouth.
Making Panini
Now that you have the recipes for everything. Grab some thick slices of your favorite bread. Let's put it all together!
The trick to getting delicious panini is MAYONNAISE. Yup, mayo. But not on the inside (necessarily), in order to get those lovely brown sears on the outside, you need it. I know a lot of people are against mayo. I actually know two people that will scrape Boursin out of a sandwich because it resembles mayo, and one can't be too sure it's not. (Here's where I shake my head. Mayo is delicious.) But if you're one of those people, you could use butter or some other grease.
I know you want to jump right in and start building up your panini. Don't. I know you want to see it come together and fantasize about the orgy on your tastebuds. But please, be patient. Make sure your panini press, grill, pan (what have you), is nice and hot. If it's not, you'll just end up with a greasy mess.
Slather about a tablespoon of mayo on one side of your bread, place it, mayo side down on heat source.
Arrange your pulled pork onto that slice, you can make it as loaded as you want, but remember if it's too full, it'll take longer to be ready. You can add a dollop of bbq sauce over the meat at this time, or serve it as a dipping sauce along with the panini. Mmmmmm bbq sauce.
Add some carmelized onions.
From the cold mac and cheese, place a square directly onto your panini. We found that we had to slice it in half, height-wise. It was just too much for the ratio.
Add more cheese if you dare!
Slather another tablespoon of mayo on another slice of bread. Place mayo side out, on your panini.
There you have it. If you have a panini press, close the lid and wait for the green light. If you're using less techno-gizmo savvy methods, flip and smash down to get a hot, cheesy, melty sammy. Honestly, this thing was so filling, I only finished half.
Mmmm.. but it made some mean leftovers to bring to work. wink
Other elements:
- Original post
- Slow-simmered carnitas
- Mac and cheese
- Carmelized onions, building the panini <--You are here
- Kale salad with soy citrus dressing
Wednesday, August 31, 2011
Cooking: Mac and cheese
I love mac and cheese. It's such a simple concept, yet my recipes are anything but. Ryan and I love Ina Garten's Mac and Cheese, and that's how we fell in love with gruyere! It can be so stinky and attracts hoards of flies, but it's oh-so-delicious, and we always find ways to include it in our cooking.
Anyway, on to the recipe. This one was adapted from Deceptively Delicious by Jessica Seinfeld.
Ingredients:
3 cups elbow macaroni
2 Tbsp butter
1 Tbsp all-purpose flour
1 cup nonfat (skim) milk
1 cup cauliflower puree (see below)
1 ½ cups shredded reduced fat Cheddar cheese
1 ½ cups shredded mozzarella provolone cheese
8 oz reduced fat or nonfat cream cheese
salt, pepper and paprika to taste
Directions:
Cauliflower Puree
Note: Cauliflower puree can be made in bulk and kept in the freezer.
Clean and cut florets and discard core. Steam for 8 to 10 minutes. Drain in a colander. Blend in food processer (blender) for about 2 minutes, with a few teaspoons of water, as needed, for a smooth, creamy texture.
Macaroni and Cheese
Bring a large pot of salted water to a boil, add macaroni, and cook according to package directions until al dente. Drain in a colander.
While the macaroni is cooking, heat large saucepan over medium heat. Add the butter, then the flour, and cook, stirring constantly, until the mixture resembles a thick paste but has not browned, 1 to 2 minutes.
Add the milk and cook, stirring every now and then, until the mixture begins to thicken, 3 to 4 minutes. Add the vegetable puree, cheddar cheese, cream cheese, salt pepper, and paprika, and stir until the cheese is melted and the sauce is smooth. Stir in the macaroni.
Pour macaroni and cheese into a greased baking dish.
Add butter and bread crumbs on top of the macaroni and cheese.
Place baking dish in the oven on broil for approximately 10 minutes (or until bread crumbs are lightly toasted).
Unless you are having a panini party, you probably won't need the whole tray of mac and cheese. It's also best to use mac and cheese that has been refrigerated, as it hold firmly when you place it into the sandwich and proceed to press it for panini. So I suggest making the carnitas and mac and cheese on separate nights and then using the leftovers to make panini on the third night.
Other elements:
- Original post
- Slow-simmered carnitas
- Mac and cheese <--You are here
- Carmelized onions, building the panini
- Kale salad with soy citrus dressing
Sweet dreams of firearms and targets
When Ella was barely 2 weeks old, we propped a silhouette of daddy's AR on her arm.

Say what you may about our parenting, but I see nothing wrong with exposing my family to weapons -- presuming they are also exposed to lessons on safe-handling and responsible behavior. Yes, I do listen to country music. Yes, our house is protected by the Good Lord and our guns.
Anyway, back to my post. I was watching "Wild Target" with Bill Nighy, Emily Blunt, and Rupert Grint. As quirky British comedies go, I loved the movie. Especially the scene in which assassin Victor shows Tony to his bedroom, in which there is a nursery mobile spinning above the bed. What's so great about this scene?

This.Mobile.Is.Awesome.

The internets returned no results relating to my query on how to go about building one of these. In fact, a search of "baby+mobile+firearm" showed results for "how to make a baby mobile using a glue gun" Say what? I asked for firearm, not gun.
You better believe if I find out Ella's having a sibling, I will be refashioning her zebra and elephant mobile to a hip firearm and target assortment, with pistols, gatling gun, and maybe an AR. Or if someone starts selling them. Either way, I will be sure to post about it.
Please do not steal the picture of my Ella, that is mine. I do not have any claim on the movie stills shown here.
Say what you may about our parenting, but I see nothing wrong with exposing my family to weapons -- presuming they are also exposed to lessons on safe-handling and responsible behavior. Yes, I do listen to country music. Yes, our house is protected by the Good Lord and our guns.
Anyway, back to my post. I was watching "Wild Target" with Bill Nighy, Emily Blunt, and Rupert Grint. As quirky British comedies go, I loved the movie. Especially the scene in which assassin Victor shows Tony to his bedroom, in which there is a nursery mobile spinning above the bed. What's so great about this scene?
This.Mobile.Is.Awesome.
The internets returned no results relating to my query on how to go about building one of these. In fact, a search of "baby+mobile+firearm" showed results for "how to make a baby mobile using a glue gun" Say what? I asked for firearm, not gun.
You better believe if I find out Ella's having a sibling, I will be refashioning her zebra and elephant mobile to a hip firearm and target assortment, with pistols, gatling gun, and maybe an AR. Or if someone starts selling them. Either way, I will be sure to post about it.
Please do not steal the picture of my Ella, that is mine. I do not have any claim on the movie stills shown here.
Tuesday, August 30, 2011
Cooking: Slow-simmered carnitas
Here we go! This was the first time I was making carnitas. In the 4 years of having a slow cooker, I have only used it to make chili or shoyu pork. I was a little nervous considering the ingredients, and previous failed attempts with altering recipes (to be shared with at a later time).
The pork came out delicious! I can imagine having them in a burrito or just served with mexican rice and a scoop of refried beans, with dollops of guacamole and sour cream. But, before I get carried away, here is the recipe I used.
Adapted from allrecipes.com - I didn't have coriander and I threw in an extra bay leaf since the turkish bay leaves I use are smaller than I see in the McCormick's bottles at the grocery store.
Ingredients:
1 tsp Kosher salt
1 tsp garlic powder
1 tsp ground cumin
½ tsp crumbled dried oregano
¼ tsp ground cinnamon
4 lbs boneless pork shoulder roast
3 bay leaves
2 cans chicken broth
Directions:
Mix together salt, garlic powder, cumin, oregano, and cinnamon in a bowl. Coat pork with the spice mixture. Place the bay leaves in the bottom of a slow cooker and place the pork on top. Pour the chicken broth around the sides of the pork, being careful not to rinse off the spice mixture.
Cover and cook on low. Turn the meat after it has cooked for 5 hours. Cook until the pork shreds easily with a fork, about 10 hours total. When the pork is tender, remove from slow cooker, and shred with two forks. Use cooking liquid as needed to moisten the meat.
Other elements:
- Original post
- Slow-simmered carnitas <--You are here
- Mac and cheese
- Carmelized onions, building the panini
- Kale salad with soy citrus dressing
Monday, August 29, 2011
Cooking: Panini and salad
I know that title seemed really lame. I mean, REALLY. Panini and salad? I know titles can make all the difference but having a super long post title means a super long url (of course, not if you use a shortened link thing). Anyway, what this post really should have been called:

Ryan came up with the idea after oogling at pictures of similar concoctions. He decided to make his panini with kalua pork instead of carnitas and an extra layer of cheddar.
Of course, you can take inspiration from here and come up with your own blend of store bought/personal recipes. But, want to know how I made it? Over the course of this week, I'll post up the recipes so you can make your own!
Other elements:
Slow-simmered carnitas with mac and cheese and carmelized onions bbq panini and kale salad with soy citrus dressing
Ryan came up with the idea after oogling at pictures of similar concoctions. He decided to make his panini with kalua pork instead of carnitas and an extra layer of cheddar.
Of course, you can take inspiration from here and come up with your own blend of store bought/personal recipes. But, want to know how I made it? Over the course of this week, I'll post up the recipes so you can make your own!
Other elements:
- Original post <--You are here
- Slow-simmered carnitas
- Mac and cheese
- Carmelized onions, building the panini
- Kale salad with soy citrus dressing
Friday, August 26, 2011
Follow along: Terra Scintilla Bracelet
I saw these super cute bracelets a few weeks ago and was totally inspired to make them as Christmas gifts for the tweens in our family.
(1) What in the the world are tweens?
It's the age between kid and teenager. They're too old to do the lame, childish stuff with their parents and younger siblings, and too young to be driven by hormonally emotional tantrums (but not immune to tantrums in itself). So youth ranging in ages 9 - 12.
(2) Gift giving, really?
I've always tried to justify the anti-gift. You know, the one where your parents give a blanket gift and you get a token appearance in the "From" portion of the gift tag? I justified, not giving a gift because a) I was just a kid, b) I'm young (in my career) and struggling with rent/mortgage, c) we're just not that close.
However, when you have kids, there's no excuse. People that aren't that close, with mortgages, start buying things for your kids. You want to tell them kindly, that it's not necessary, yet you find yourself receiving gifts all year round. So, you must reciprocate.
I try to come up with clever ideas or trendy gifts. I'm not really sure what tweens are into: one day it's Justin Bieber, the next it's Silly Bandz. Although I'm guessing I was similarly as finicky between Jonathan Taylor Thomas and slap bracelets (btw, did anyone else see those bright blingy slap watches at Nordstrom?!). Because of this similarity, I try to think, "Ok, so if I was in elementary school, would I be cool for having this, or a big joke?" And I know popularity isn't everything, but it counts for something. These diy bracelets fall under "cool" for me. I would love receiving them as a gift now, and I imagine I would have been complimented had I donned these in 6th grade.
I found a set of bangle bracelets on clearance at Icing for $6.50. It included 3 thinner bangles, 2 thick ones and one with a strip of rhinestone trim.

It was awesome that it had rhinestone trim. As I mentioned before, it's difficult finding things in Hawaii. You gotta be resourceful and make do. I just happened to be lucky.

Using some E-6000 (craft glue) I picked up at WalMart, I followed the instructions to attach the rhinestones to the thinner bangles. From this picture, you can see the 2 thicker ones that were included (I may just pair them with the crafted ones for a fun combo).

Also from WalMart, I picked up pretty colored Jute Cord for $3.99. I personally like the versatility of black and gray, so of course I opted for these instead of the neon variety.

A simple cobra knot covers the bangle and helps squeeze in extra knots to secure the rhinestones.

The picture doesn't quite do it justice (and I'm not about to figure out how to take pictures with Ryan's SLR, then upload them to my computer, bleh!), but it came out nice and I can see myself paying $26< at a boutique for a set of three.
After purchasing everything, it came out to less than $5.00 each. Keep in mind I didn't have bangle bracelets, rhinestone trim, decorative cord, or craft glue. I'm sure many crafters out there have most of these supplies and can just whip up something from their stash.
I definitely can raid my fabric scraps to make a little pouch to gift them. So all in all, a handmade, cute, affordable gift --and no embarassment come birthday or holiday!
Any ideas for gifts for the undertweens? I'm in need of gifts for kids under 7. Possibly this pretend make-up kit?
(1) What in the the world are tweens?
It's the age between kid and teenager. They're too old to do the lame, childish stuff with their parents and younger siblings, and too young to be driven by hormonally emotional tantrums (but not immune to tantrums in itself). So youth ranging in ages 9 - 12.
(2) Gift giving, really?
I've always tried to justify the anti-gift. You know, the one where your parents give a blanket gift and you get a token appearance in the "From" portion of the gift tag? I justified, not giving a gift because a) I was just a kid, b) I'm young (in my career) and struggling with rent/mortgage, c) we're just not that close.
However, when you have kids, there's no excuse. People that aren't that close, with mortgages, start buying things for your kids. You want to tell them kindly, that it's not necessary, yet you find yourself receiving gifts all year round. So, you must reciprocate.
I try to come up with clever ideas or trendy gifts. I'm not really sure what tweens are into: one day it's Justin Bieber, the next it's Silly Bandz. Although I'm guessing I was similarly as finicky between Jonathan Taylor Thomas and slap bracelets (btw, did anyone else see those bright blingy slap watches at Nordstrom?!). Because of this similarity, I try to think, "Ok, so if I was in elementary school, would I be cool for having this, or a big joke?" And I know popularity isn't everything, but it counts for something. These diy bracelets fall under "cool" for me. I would love receiving them as a gift now, and I imagine I would have been complimented had I donned these in 6th grade.
I found a set of bangle bracelets on clearance at Icing for $6.50. It included 3 thinner bangles, 2 thick ones and one with a strip of rhinestone trim.
It was awesome that it had rhinestone trim. As I mentioned before, it's difficult finding things in Hawaii. You gotta be resourceful and make do. I just happened to be lucky.
Using some E-6000 (craft glue) I picked up at WalMart, I followed the instructions to attach the rhinestones to the thinner bangles. From this picture, you can see the 2 thicker ones that were included (I may just pair them with the crafted ones for a fun combo).
Also from WalMart, I picked up pretty colored Jute Cord for $3.99. I personally like the versatility of black and gray, so of course I opted for these instead of the neon variety.
A simple cobra knot covers the bangle and helps squeeze in extra knots to secure the rhinestones.
The picture doesn't quite do it justice (and I'm not about to figure out how to take pictures with Ryan's SLR, then upload them to my computer, bleh!), but it came out nice and I can see myself paying $26< at a boutique for a set of three.
After purchasing everything, it came out to less than $5.00 each. Keep in mind I didn't have bangle bracelets, rhinestone trim, decorative cord, or craft glue. I'm sure many crafters out there have most of these supplies and can just whip up something from their stash.
I definitely can raid my fabric scraps to make a little pouch to gift them. So all in all, a handmade, cute, affordable gift --and no embarassment come birthday or holiday!
Any ideas for gifts for the undertweens? I'm in need of gifts for kids under 7. Possibly this pretend make-up kit?
Wednesday, August 24, 2011
Internet superstar
I was flipping through the pictures on my phone, as I'm running out of space, and I don't want to waste precious storage with non-Ella pictures, when I stumbled on this picture.
The little munch has been sprouting like crazy. Between growth spurts, new teeth, and a newfound love of Trader Joe's Fruity Flakes (of course the one food I can't just go pick up for her, since Hawaii doesn't have Trader Joe's), we can hardly keep up with her antics.
Anyway, a few months ago, Ryan and I stopped in our tracks, jaws agape, at this little "big" girl.
Story goes like this -- I wake up at 5:30am on the weekdays and am out the door by 6. Ryan works closer to home and doesn't require to leave at dark o'clock to make it in on time. Ella will either sleep like a lump on a log or be bouncing off the walls - depending on the morning.
On this one occasion, the little munch was already awake so Ryan left her on our bed while he was in the bathroom getting ready for work. He walks out to see her bridged between the bed and his laptop stand, with the biggest, brightest grin on her face.
He hears her clicking away, and slightly worried, as macs have a gazillion shortcuts that will make your screen extremely zoomed in, with inverted colors, and a pop-up bubble detailing what your cursor is doing, that she's done some inconvenient, but not unreparable damage.
He walks over to see what the big smile is about:

She navigated to the campmor website, into the children's apparel, to shoes, to these winter boots, that also come in pink. This was the reason she was so happy.
I don't know how she got the browser open, typed in the url, clicked to the children's section, and went shoe shopping. Ryan was shocked. He texted me at work. I was shocked.
Ella is a genius.
The little munch has been sprouting like crazy. Between growth spurts, new teeth, and a newfound love of Trader Joe's Fruity Flakes (of course the one food I can't just go pick up for her, since Hawaii doesn't have Trader Joe's), we can hardly keep up with her antics.
Anyway, a few months ago, Ryan and I stopped in our tracks, jaws agape, at this little "big" girl.
Story goes like this -- I wake up at 5:30am on the weekdays and am out the door by 6. Ryan works closer to home and doesn't require to leave at dark o'clock to make it in on time. Ella will either sleep like a lump on a log or be bouncing off the walls - depending on the morning.
On this one occasion, the little munch was already awake so Ryan left her on our bed while he was in the bathroom getting ready for work. He walks out to see her bridged between the bed and his laptop stand, with the biggest, brightest grin on her face.
He hears her clicking away, and slightly worried, as macs have a gazillion shortcuts that will make your screen extremely zoomed in, with inverted colors, and a pop-up bubble detailing what your cursor is doing, that she's done some inconvenient, but not unreparable damage.
He walks over to see what the big smile is about:
She navigated to the campmor website, into the children's apparel, to shoes, to these winter boots, that also come in pink. This was the reason she was so happy.
I don't know how she got the browser open, typed in the url, clicked to the children's section, and went shoe shopping. Ryan was shocked. He texted me at work. I was shocked.
Ella is a genius.
Monday, August 22, 2011
Dressy wipes case
Ok, last newborn/baby shower post (for a while), I promise! This time it's for real, as the party came and went.
Almost all of the craft blogs I follow have tutorials for some sort of tutorial for blinding out a wipes case. So why not?
Using the same fabric as the nursing cover, along with some batting, I fancied it up. Oh the magic of E-6000, hot glue, ric rac, and grosgrain!

I even lined it so the print would show through the case. Attention to detail!

Okay, I'll go back to posting other stuff.. Or maybe take another mini hiatus. Ha!
Almost all of the craft blogs I follow have tutorials for some sort of tutorial for blinding out a wipes case. So why not?
Using the same fabric as the nursing cover, along with some batting, I fancied it up. Oh the magic of E-6000, hot glue, ric rac, and grosgrain!
I even lined it so the print would show through the case. Attention to detail!
Okay, I'll go back to posting other stuff.. Or maybe take another mini hiatus. Ha!
Tuesday, August 16, 2011
Diaper Pocket Carry-all
"What? More?" you say? Yes, what's wrong with a little ambitiousness? Sometimes. I've got a few more tricks up my sleeve, too!
I still had lots of fabric left over, so I made a tote to carry around some diapers, wipes, and maybe a disposable changing pad, and a tube of petroleum jelly.
I followed the tutorial from Noodlehead. It was really easy. Of course I had to make up my own measurements since I had different sizes of scraps. Instead of linen, I used a type of basketweave cloth. it makes it kinda earthy.

I also added a tab at the back where the closure is, so that it could be hung from one of those mommyhooks on a stroller (we use ours a lot --my purse-- and it was on their registry and so we bought it). A perfect pouch to take in a quick walk around the mall when you don't want to lug around a huge diaper bag.*
*Yes, I was one of those moms that thought I needed a spacious diaper bag to carry everything. You never know when you need a bandaid, or a nursing cover, or an extra shirt, or disposable changing pads, or scenty soiled diaper bags, etc. Then I realized you just need a couple of diapers, some wipes, and a sippy cup of water and you're good. You could probably do without anything and you'd be fine.
I still had lots of fabric left over, so I made a tote to carry around some diapers, wipes, and maybe a disposable changing pad, and a tube of petroleum jelly.
I followed the tutorial from Noodlehead. It was really easy. Of course I had to make up my own measurements since I had different sizes of scraps. Instead of linen, I used a type of basketweave cloth. it makes it kinda earthy.
I also added a tab at the back where the closure is, so that it could be hung from one of those mommyhooks on a stroller (we use ours a lot --my purse-- and it was on their registry and so we bought it). A perfect pouch to take in a quick walk around the mall when you don't want to lug around a huge diaper bag.*
*Yes, I was one of those moms that thought I needed a spacious diaper bag to carry everything. You never know when you need a bandaid, or a nursing cover, or an extra shirt, or disposable changing pads, or scenty soiled diaper bags, etc. Then I realized you just need a couple of diapers, some wipes, and a sippy cup of water and you're good. You could probably do without anything and you'd be fine.
Monday, August 15, 2011
Lazy appliqué
A day after I made the burp cloths, I thought it needed a little something more. I went back to the invitation for some inspiration. Ok, so it's not the best picture, I had to upload it, then I had to blur some of the details, then yah, it just wasn't working out for me. Oh well. You get the gist of the invitation.

Since there was an obvious theme, music, I wanted to tie in our gift in some way! So I cut out felt shapes to decorate the burp cloths. I couldn't really remember what music notes looked like, so I had to google image them. I picked out a treble clef, bass clef, and an eighth note. I hand cut the designs using the printouts as templates. Then sewed them on to the burp cloths. I made sure there wouldn't be any loose parts that could cause a choking hazard, and each section is double sewed on. I even used white thread in the bobbin to make it less obvious!

I think it came out pretty cute. I totally customized!
Since there was an obvious theme, music, I wanted to tie in our gift in some way! So I cut out felt shapes to decorate the burp cloths. I couldn't really remember what music notes looked like, so I had to google image them. I picked out a treble clef, bass clef, and an eighth note. I hand cut the designs using the printouts as templates. Then sewed them on to the burp cloths. I made sure there wouldn't be any loose parts that could cause a choking hazard, and each section is double sewed on. I even used white thread in the bobbin to make it less obvious!
I think it came out pretty cute. I totally customized!
Sunday, August 14, 2011
Burp cloths
Like I mentioned before, I wanted to make a set of items for the gift. So in addition to the hospital gown and nursing cover, I wanted to make burp cloths! I received a set of similar ones from my step mom. It was like 12 different prints and so very cute!
I only had one pack of burp cloths, so 6 was all I could make.

As you can see, I made burp cloths to match the nursing cover.

I made burp cloths to match the hospital gown. (Oops, that's right, I didn't have a picture of the hospital gown. Anyway, I used Chartreuse by Piece O'Cake Designs from Daisies and Dots for Robert Kaufman)

And this cute little animal print to go along with it. Unfortunately, I can't tell you what this is. It was a stash that I had from browsing the throwaway bins at WalMart. I love how they discount unpurchased/scrap piece fabric.

I only had one pack of burp cloths, so 6 was all I could make.
As you can see, I made burp cloths to match the nursing cover.
I made burp cloths to match the hospital gown. (Oops, that's right, I didn't have a picture of the hospital gown. Anyway, I used Chartreuse by Piece O'Cake Designs from Daisies and Dots for Robert Kaufman)
And this cute little animal print to go along with it. Unfortunately, I can't tell you what this is. It was a stash that I had from browsing the throwaway bins at WalMart. I love how they discount unpurchased/scrap piece fabric.
Saturday, August 13, 2011
Nursing cover
My friends are expecting their first child at the end of September. Finally, more friends are jumping in to the parenting boat! It's so hard to be one of the few with kids -- everyone still lives their partying, late-night lives, while we go to bed before the 10 o'clock news.
Anyway, she's due in late September, but after a recent scare, she's on bedrest until delivery. I scrambled to get part of her gift made - a designer hospital gown. I made one for myself because I didn't want to use the icky hospital ones, and I wanted it as a keepsake for later. I also made one for another friend. I'm not sure if she used it, but oh well.
So because of the scare, my friend experienced said icky hospital gowns. They had holes, stains, and the closure straps were broken off. With her shower coming up, I wanted to make sure she gets it right away, so unfortunately no pictures. It's came out really nice though!
It has velcro tabs on the shoulders for easy pull away for the tubes and tapes that get hooked up or if she doesn't get to use the gown (C-section), then she can use it for nursing when she's in postpartum wing.
As part of our gift, I wanted to make a set of items that she could use. So I also made a nursing cover in a coordinating fabric. I decided that I was going to make everything in a lime green, teal, yellow palette. I made a couple changes from the original instructions. (1) I used D-rings on my own nusing cover, and hated it--I would rather have had ties. It was easy enough to slip over my head and I would never get a shock of really cold metal against my neck. (2) I sewed the casing for the boning before inserting it. It was too difficult to navigate the presser foot around the curves and plastic. (3) In one corner, instead of a triangle "wipe", I made a pocket to stick in some disposable pads. I changed them frequently, but didn't always have pockets to carry them. If they were on the cover it would have made it so much more convenient!

I really like this fabric. It's so bright and teal and just POPS!

I also love promotional t-shirts. It's got that soft knit feel, without the hard work of hemming.

The shower is today, but I have a few more items to share. So they'll go up as I have time to upload pics from my phone and write a bit about them.
Anyway, she's due in late September, but after a recent scare, she's on bedrest until delivery. I scrambled to get part of her gift made - a designer hospital gown. I made one for myself because I didn't want to use the icky hospital ones, and I wanted it as a keepsake for later. I also made one for another friend. I'm not sure if she used it, but oh well.
So because of the scare, my friend experienced said icky hospital gowns. They had holes, stains, and the closure straps were broken off. With her shower coming up, I wanted to make sure she gets it right away, so unfortunately no pictures. It's came out really nice though!
It has velcro tabs on the shoulders for easy pull away for the tubes and tapes that get hooked up or if she doesn't get to use the gown (C-section), then she can use it for nursing when she's in postpartum wing.
As part of our gift, I wanted to make a set of items that she could use. So I also made a nursing cover in a coordinating fabric. I decided that I was going to make everything in a lime green, teal, yellow palette. I made a couple changes from the original instructions. (1) I used D-rings on my own nusing cover, and hated it--I would rather have had ties. It was easy enough to slip over my head and I would never get a shock of really cold metal against my neck. (2) I sewed the casing for the boning before inserting it. It was too difficult to navigate the presser foot around the curves and plastic. (3) In one corner, instead of a triangle "wipe", I made a pocket to stick in some disposable pads. I changed them frequently, but didn't always have pockets to carry them. If they were on the cover it would have made it so much more convenient!
I really like this fabric. It's so bright and teal and just POPS!
I also love promotional t-shirts. It's got that soft knit feel, without the hard work of hemming.
The shower is today, but I have a few more items to share. So they'll go up as I have time to upload pics from my phone and write a bit about them.
Subscribe to:
Posts (Atom)